Pages

For Sale

Showing posts with label misti. Show all posts

Tuesday, March 20, 2018

Reverse Confetti Spring Fling Blog Hop

Welcome to the Reverse Confetti - My Sweet Petunia blog hop! The entire hop is linked below and of course there's a prize involved, so be sure to leave comments at each of the blogs linked below. 
Good luck!

I have a project for you today featuring Reverse Confetti's Clear Tote that I've filled with the cutest little wind up chick, just in time for Easter. I lined the bottom with yummy new patterned paper from the Fun Times 6x6 pad using the coordinating In The Bag Confetti Cuts die. I think these papers simply scream "Spring"!

I used my Mini Misti to stamp both the tag sentiment and cute little chick (or is it a ducky, hmm?) for a nice, solid image. I find that when stamping a sentiment on patterned paper, that solid coverage really makes the sentiment pop over the pattern.  The sentiment is from Hippity Hoppity and the chick is from All About Ewe, two great sets for Spring.


Two lucky commenters from the hop will win one of two prizes: a $60 shopping spree at My Sweet Petunia or a $60 shopping spree at Reverse Confetti. Comments must be left no later than Sunday, March 25th, at 11:59 PM Central time and winners will be announced on Tuesday March 27th, on the Reverse Confetti and My Sweet Petunia blogs.

Amy Rohl <---you are here

Friday, April 21, 2017

SugarPea Designs is hopping with My Sweet Petunia!

Welcome to the blog and happy Friday! We are kicking off the weekend with a fun hop promoting two awesome companies - SugarPea Designs & My Sweet Petunia (home of the MISTI). There are some awesome giveaways from both companies, so be sure to leave a comment before you hop along (see the entire hop list below).

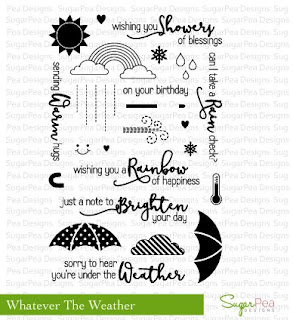
For my stop on the hop, I'm sharing a picture tutorial using stamps and dies from SugarPea Designs in conjunction with the MISTI tool and MISTI Creative Corners.  I used SugarPea's Striped Background stamp along with Whatever The Weather stamps and dies. Thanks to a bit of stamp surgery I was able to customize the rainbow striped background and vary the space between stripes. I simply (and carefully) trimmed off one of the stripes and then used my MISTI + Creative Corners to stamp stripes precisely where I wanted them and in a rainbow of colors. 

step one
I placed my single stripe first on the grid paper to ensure that it was nice and straight

step two
Using one of the two corners with embedded magnets for precise placement, I placed my cardstock inside the corner

step three
I stamped my first stripe with aqua ink, repeating several times for solid coverage. The corner piece allows me to re-position the cardstock in the exact spot as needed.

step four
I simply move the corner piece up the left hand edge of the MISTI to continue stamping stripes in different colors, varying the amount of space between stripes for a little change-up.

step five
At this point, I flipped my cardstock to stamp the final two stripes in orange and fuschia.

step six
The corner also helps to hold things in place while I decide on the placement of the sentiment.

step seven
I'm able to repeatedly stamp the sentiment for solid coverage.

step eight
Tip: double cut the umbrella and pop up the second inside layer for dimension.


 Please leave a comment on each of the links below for a chance to win the following with winners being announced on April 28th HERE and on the SPD blog:

MISTI (winner's choice of original or mini)
(2) $25 gift certificates to SugarPea Designs

LinkWithin

Related Posts Plugin for WordPress, Blogger...